Tuesday, May 31, 2011

Drop it like it's hot...errr cold.


Looking for a cool way to beat the heat? Try this easy, delicious recipe!
Ingredients:

1/2 cup water

1/2 cup sugar

2 pounds strawberries (fresh or frozen)
2 tbs fresh lemon juice
Method:
mix water and sugar in a small saucepan and warm until sugar dissolves.

allow mixture to cool then add berries, sugar water, and lemon juice together in a blender. Blend until smooth then pour into ice cream maker.

once mostly frozen, transfer mixture to an airtight container and allow to firm in freezer for 1-2 hours.

Cool Mystery Link!

Surprise! I have a cool link for you to explore (two in one day!)! Are you nervous to open it? Take a risk and see what it is (don't worry it's not inappropriate). Maybe you'll like it. Cool people take risks.

Cool People Need...Cool Gadgets

Caged Smores Toaster
Hot-Pot Grill (So that you can disguise it in your garden!)


A cast that speaks for itself 
Gadgets_9_(funnypagenet.com)
The Pizza Pro (A new aged pizza cutter)

Bookshelf Chair
Gadgets_13_(funnypagenet.com)

Dunkable Cookie Glass
Gadgets_14_(funnypagenet.com)

Body Rocking Chair
Gadgets_17_(funnypagenet.com)

Math Clock 
(yes, if you do the equation, it equals the number that would be there)
Gadgets_28_(funnypagenet.com)

Genius
Gadgets_3_(funnypagenet.com)
Would you buy any of these gadgets?

Monday, May 30, 2011

Yummy! Marbled Strawberry Parfait Recipe!

Easy recipe turns into a delicious creamy summer dessert, refreshing and sweet.
Another cool recipe that I want to try! This woule be a great recipe to try during these hot summer days!
Here's the recipe:
Ingredients
Makes 8 servings
500 g fresh strawberries
100 ml whipping cream
250 g mascarpone
4 tbsp powdered sugar
Directions
1.
Wash strawberries, drain well, pat dry with a clean dishtowel and remove leaves. Put them into a large bowl and start mashing them using a fork or an egg beater.

2.
Whip the cream on medium speed. Add sugar and continue mixing until soft peaks form. Add mascarpone and continue mixing until is well incorporated.  

3.
Fold in mashed strawberries, very slowly, not too much to keep the marbled effect. Pour in silicone cupcake molds and transfer to the freezer for 3-4 hours. 

4.
Transfer to refrigerator half an hour before serving and garnish with strawberry slices.


Music Mondays- Here We Go Magic

It's time for me to feed your music monkey!
Here We Go Magic is an American indie rock band based in Brooklyn, New York. Formerly the moniker of folk singer Luke Temple. Temple signed to Western Vinyl in 2008, followed in 2009 by the five-piece group's signing to Secretly Canadian.After previously releasing two folk albums under his own name in the mid-2000s, Luke Temple released a self-titled album as Here We Go Magic in February 2009 on Western Vinyl, described by Pitchfork Media as "hazy electronic textures, endlessly-spiraling lyrical loops, occasional forays into extended sections of ambiance and noise". Temple recorded the album at home on a 4-track recorder, describing the recording: "I just had one tom, one microphone, a synthesizer and an acoustic guitar. I didn’t have a full drum kit or normal bass, it was just all synth stuff that I did myself."

Cool Find...Underground Wine Shelter.

Cool, huh? Would you want this in your house?
Click  here for a better look.

Cool People Need...Cool Photography!

One of the coolest photo shoots I've ever seen.
MARITA & COTY IN 1977 & 2010, Bueno
What if you had the chance to go back and recreate old pictures? This photographer, Irina Werning gave several people in Buenos Aires this chance.


Nico in 1986 & 2010, Buenos Aires

What do you think?
See more here!


On the Set...Classical Movies and TV Shows

Haven't you ever wondered how special effects were done back in the day?
On the set of Sesame Street
On the Set of Requiem For A Dream
on the set of The Gate
On the set of Monthra

Click here for more.

Thursday, May 26, 2011

Throwback Thursdays

Foo Fighters- My Hero
What's your favorite song from the 90s?

Cool Restaurant Birthday Ideas

We've all had small Birthday get together at restaurants when we've been limited on funds. Well here are four ways to spruce up your special night on a budget! I threw a surprise party for my boyfriend yesterday and used these ideas, and he loved them!

Cool Party Hats
This will bring the guest a nostalgic feeling that will take them back to their school aged parties.

Party Mustaches 
This will add some character to your pictures, and will be a conversation piece.

Sparkler Candles
Light up the night with these bad boys.

Table Game
Things can get pretty interesting with this game.

Wednesday, May 25, 2011

Cool People Need...Cool Art

Would you believe me if I told you that this is 2D, meaning that it's a flat image? Well, believe it! This type of art is called 3D Street Art because the eye can't accept the fact that these are not techically 3D images. If your brain is not hurting, see more images below ;)

Cool People have...Smart Tattoos

Afraid to get a tattoo because you're scared that you'll regret it in 30 years? Well follow this regret-free guide of where to get a tattoo. Cool people don't just get tattoos, they get SMART tattoos (tattoos in places that you won't regret while looking for a job, because nobody is cool when they are broke).
Click the link below for a better look.
Do you have any ink that you regret?

DIY...Paper Flower Key Holder

Paper Flower Key Holder
Looking for a cool gift idea, or just something to make your home decor stand out from others? Try making this Paper Flower Key Holder. I bet you'll never loose your keys again!
Click here for the instructions, then come back here to tell me what you think of the design =)

Cool DIY Necklace

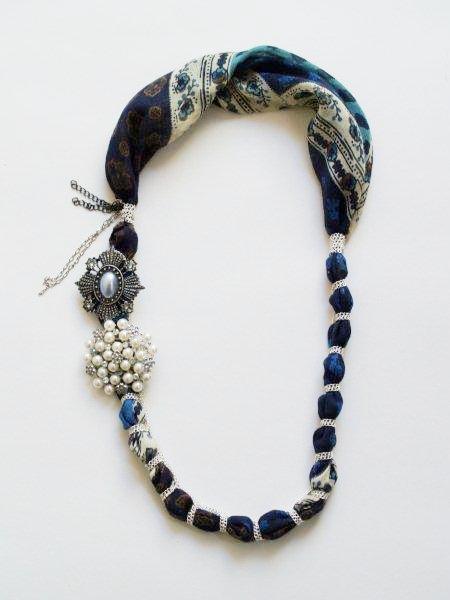
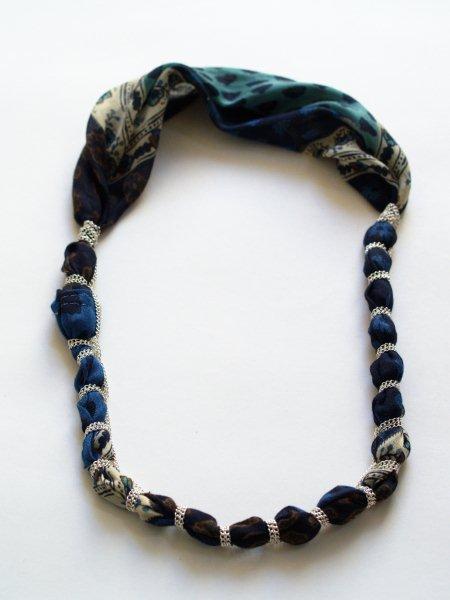
Like this necklace? Well, it's homemade! Learn how to do it below:

Materials:
  • Sewing Machine (you can hand sew it, it will just take longer)
Supplies:
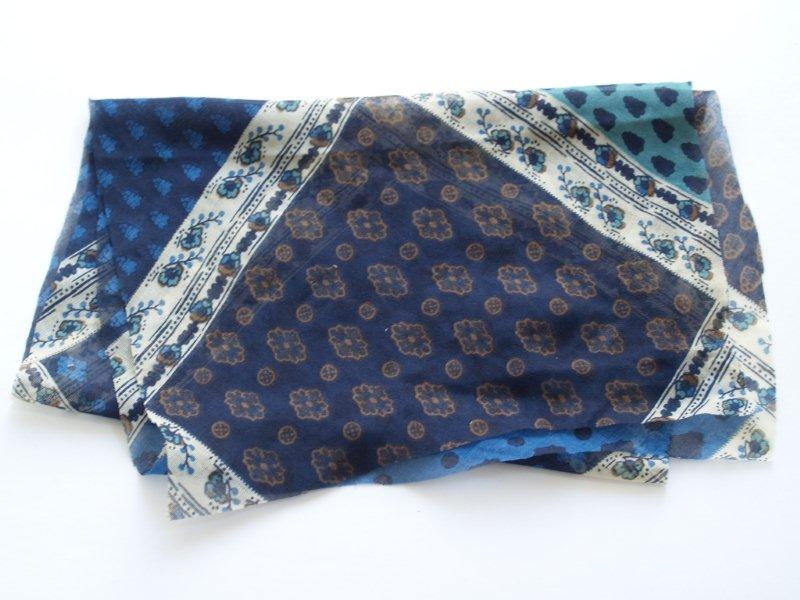
  • Scarf or lightweight fabric (you need enough for a 33″ x 12″ piece)
  • Silver chain – 4 yards
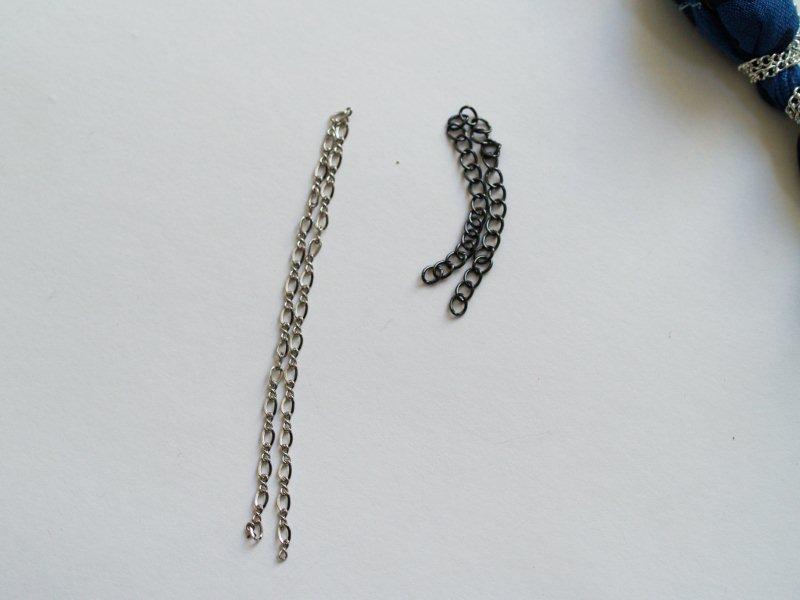
  • Small pieces of different chains
  • 2 Large beaded pieces or pins (I bought these at Michaels)
  • Needle and matching thread
Cut out your fabric – you need a 33″ x 12″ piece. I recommend you cut it out on the bias if you have enough fabric. It helps it lay nicer.
(The bias is a 45 degree angle from the selvage. It’s basically a diagonal cut.)
You can see that my fabric was pretty sheer. If yours is a thicker fabric you might want to cut down on the width of your rectangle. Try bunching it up. If it is pretty thick, I’d recommend a narrower rectangle.
With right sides together, sew the rectangle into a long tube. Turn right side out.
Turn the raw edges under and overlap them, making a circle. Sew. I did two rows of stitching to make sure it would hold.
 It helps to lay out your circle in a necklace shape. Put the seam on the left, towards the top. Place a pin on the right side of the circle, about 1″ above the point across from the seam. That is where we will start wrapping.
Double up your chain so it is 2 yards long. You will work with the chain doubled as you go – treating it as one chain.
Begin with the halfway point.
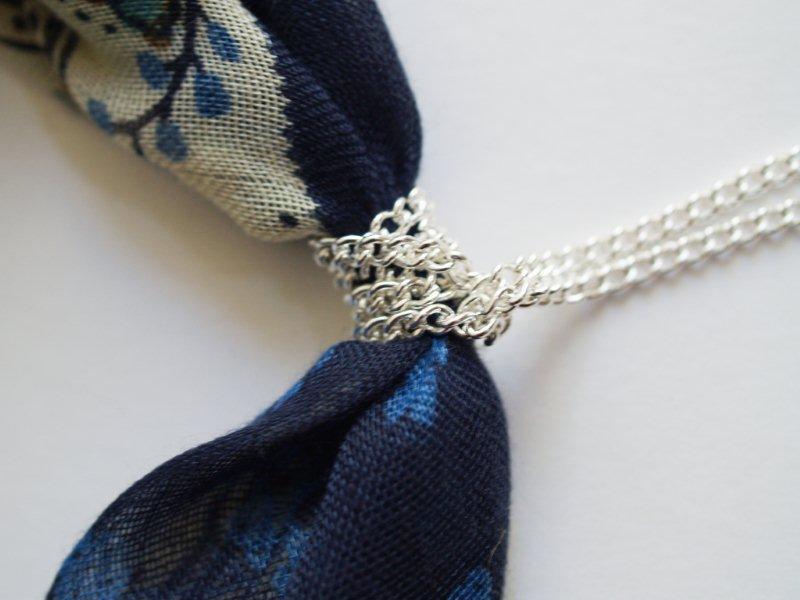
Leaving that halfway point with a little space, wrap the chain around the fabric tube twice. Feed the other ends of the doubled chain through the halfway point loop and pull. Don’t pull super tight – you don’t want to stress the chain – but so that it is snug against the fabric.
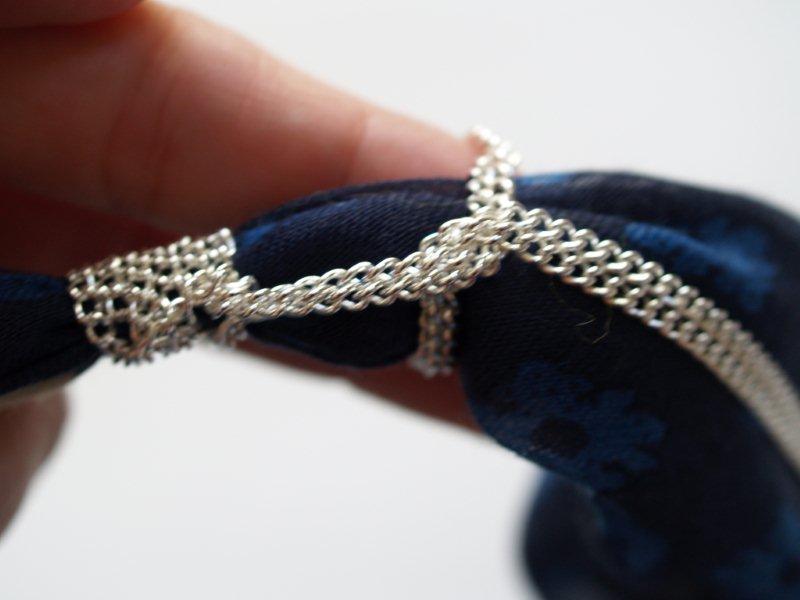
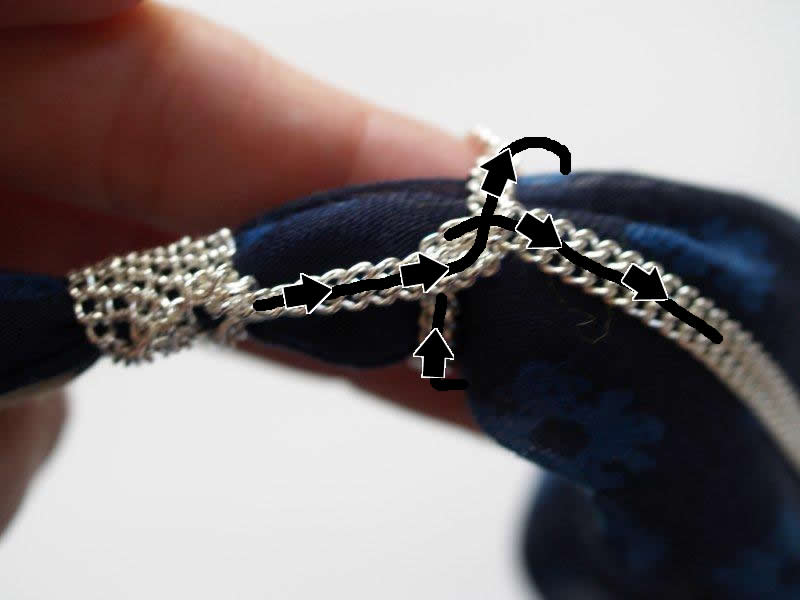
 Lay the chain along the fabric for about an inch. Hold the chain at that point. Wrap the chain around the fabric tube. Bring the ends up and run them under the wrapped part and pull snug.
 Here is a handy arrow drawing to illustrate. Don’t laugh.
Continue wrapping and looping around the bottom of the fabric tube. Keep the distance between loops the same, except for over the stitching line. That can be a bit longer.
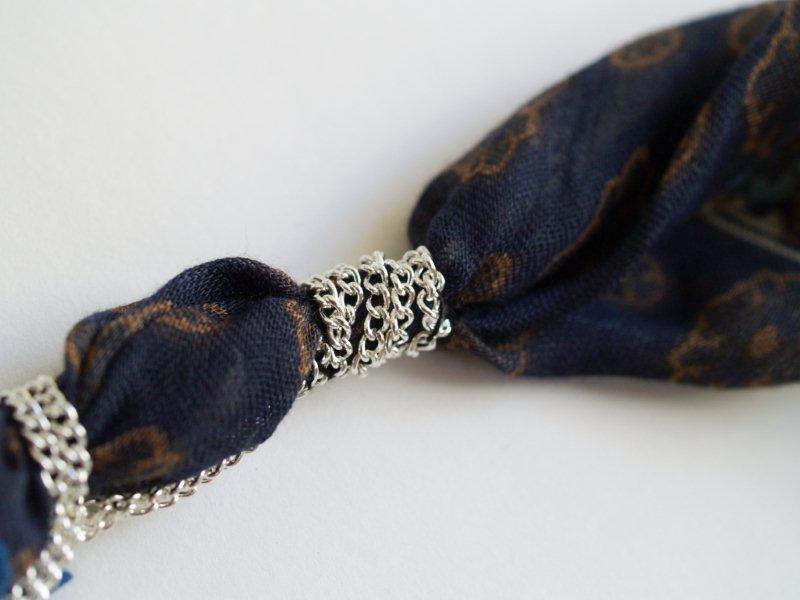
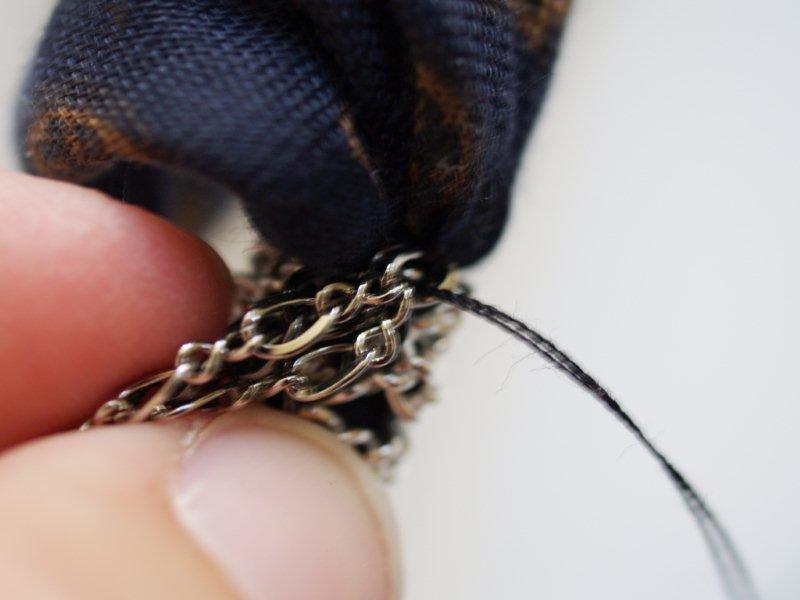
When you get just above the stitching, wrap the chain around the tube four times.
 Sew down the end of your chains.
If you have chain leftover, trim it off.
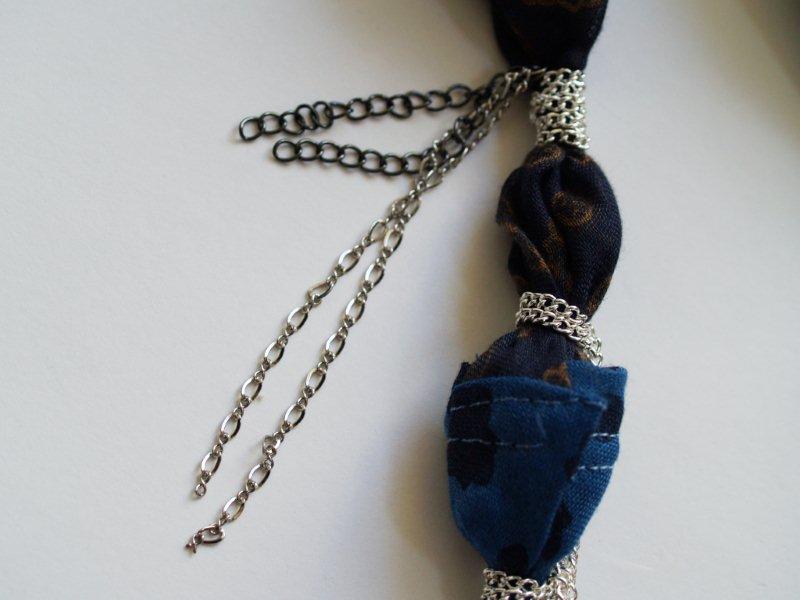
Fold in half your two small contrasting chain pieces.
 Sew the folded ends to the fabric tube at the top of your wrapped chain on the left side.
 
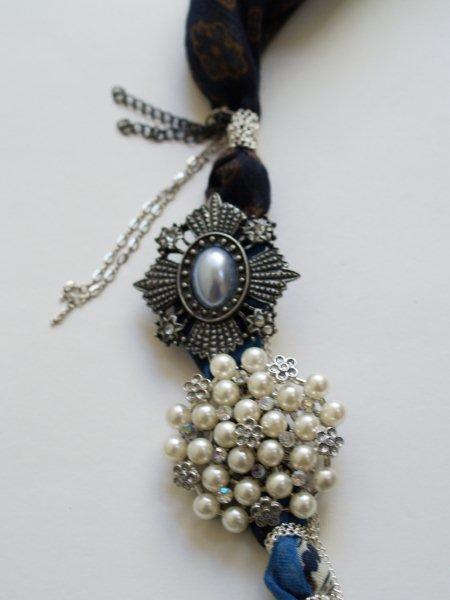
 Sew on your large beaded pieces on the left side, making sure you cover up the seam. If you are using pins, you can just pin them on, but I’d recommend sewing these on as well, for stability.